Showing posts with label lunch. Show all posts

Wednesday, February 1, 2012

Turkey Harvarti Pinwheels with Basil Mayo

I'm back at work this week after being off to help out my incompacitated husband after surgery. He still has an arm in a sling so it's up to me to do most of the chores, looking after Luc, etc. What that means is that I'm really relying on fast and fuss-free food, just like these pinwheels.

Pinwheels make a great part of a lunch. They are super quick and easy to make, more fun presentation-wise than a sandwich, and easier for little hands to manage. Also, now that there are so many more choices of nitrate-free natural deli meat so there are more options for fillings, including this one, which is a favorite around our house. You can substitues chicken for the turkey of course and another kind of cheese if you'd like as well (shaved baby parm sprinkled over top of the meat tastes awesome -- Luc perfers its more mild taste than Parmigiano Reggiano). This below recipe is just for one, but I usually make some for all of us, assembly line-style.


Turkey Havarti Pinwheels with Basil Mayo

- 1 6" whole grain tortilla
- 2 slices nitrate-free turkey deli meat
- 2 slices havarti (or cheese of your choice)
- 1 6" stalk celery, quartered lenthwise to get a skinny stick
- 2 tsp plain cream cheese
- 1 tbsp mayonnaise
- 2 tsp minced fresh basil

In a small bowl or ramekin, mix mayonnaise with fresh basil and set aside.

Lay out your tortilla, and smear the cream cheese over the last inch of the edge on half of the tortilla (the cream cheese will be your glue to hold the whole thing together). Spread the remainder with an even layer of basil mayonnaise. Lay the turkey slices on top, then layer the cheese. Place the celery stick at the lower edge and roll up as tightly as you can, pressing lightly to seal the edge. With a very sharp knife, slice the roll into even slices. Pop the two ugly end pieces in your month to pretend they were never there.


Wednesday, August 3, 2011

Recipe Shout-Out: Amazing Grilled Cheese

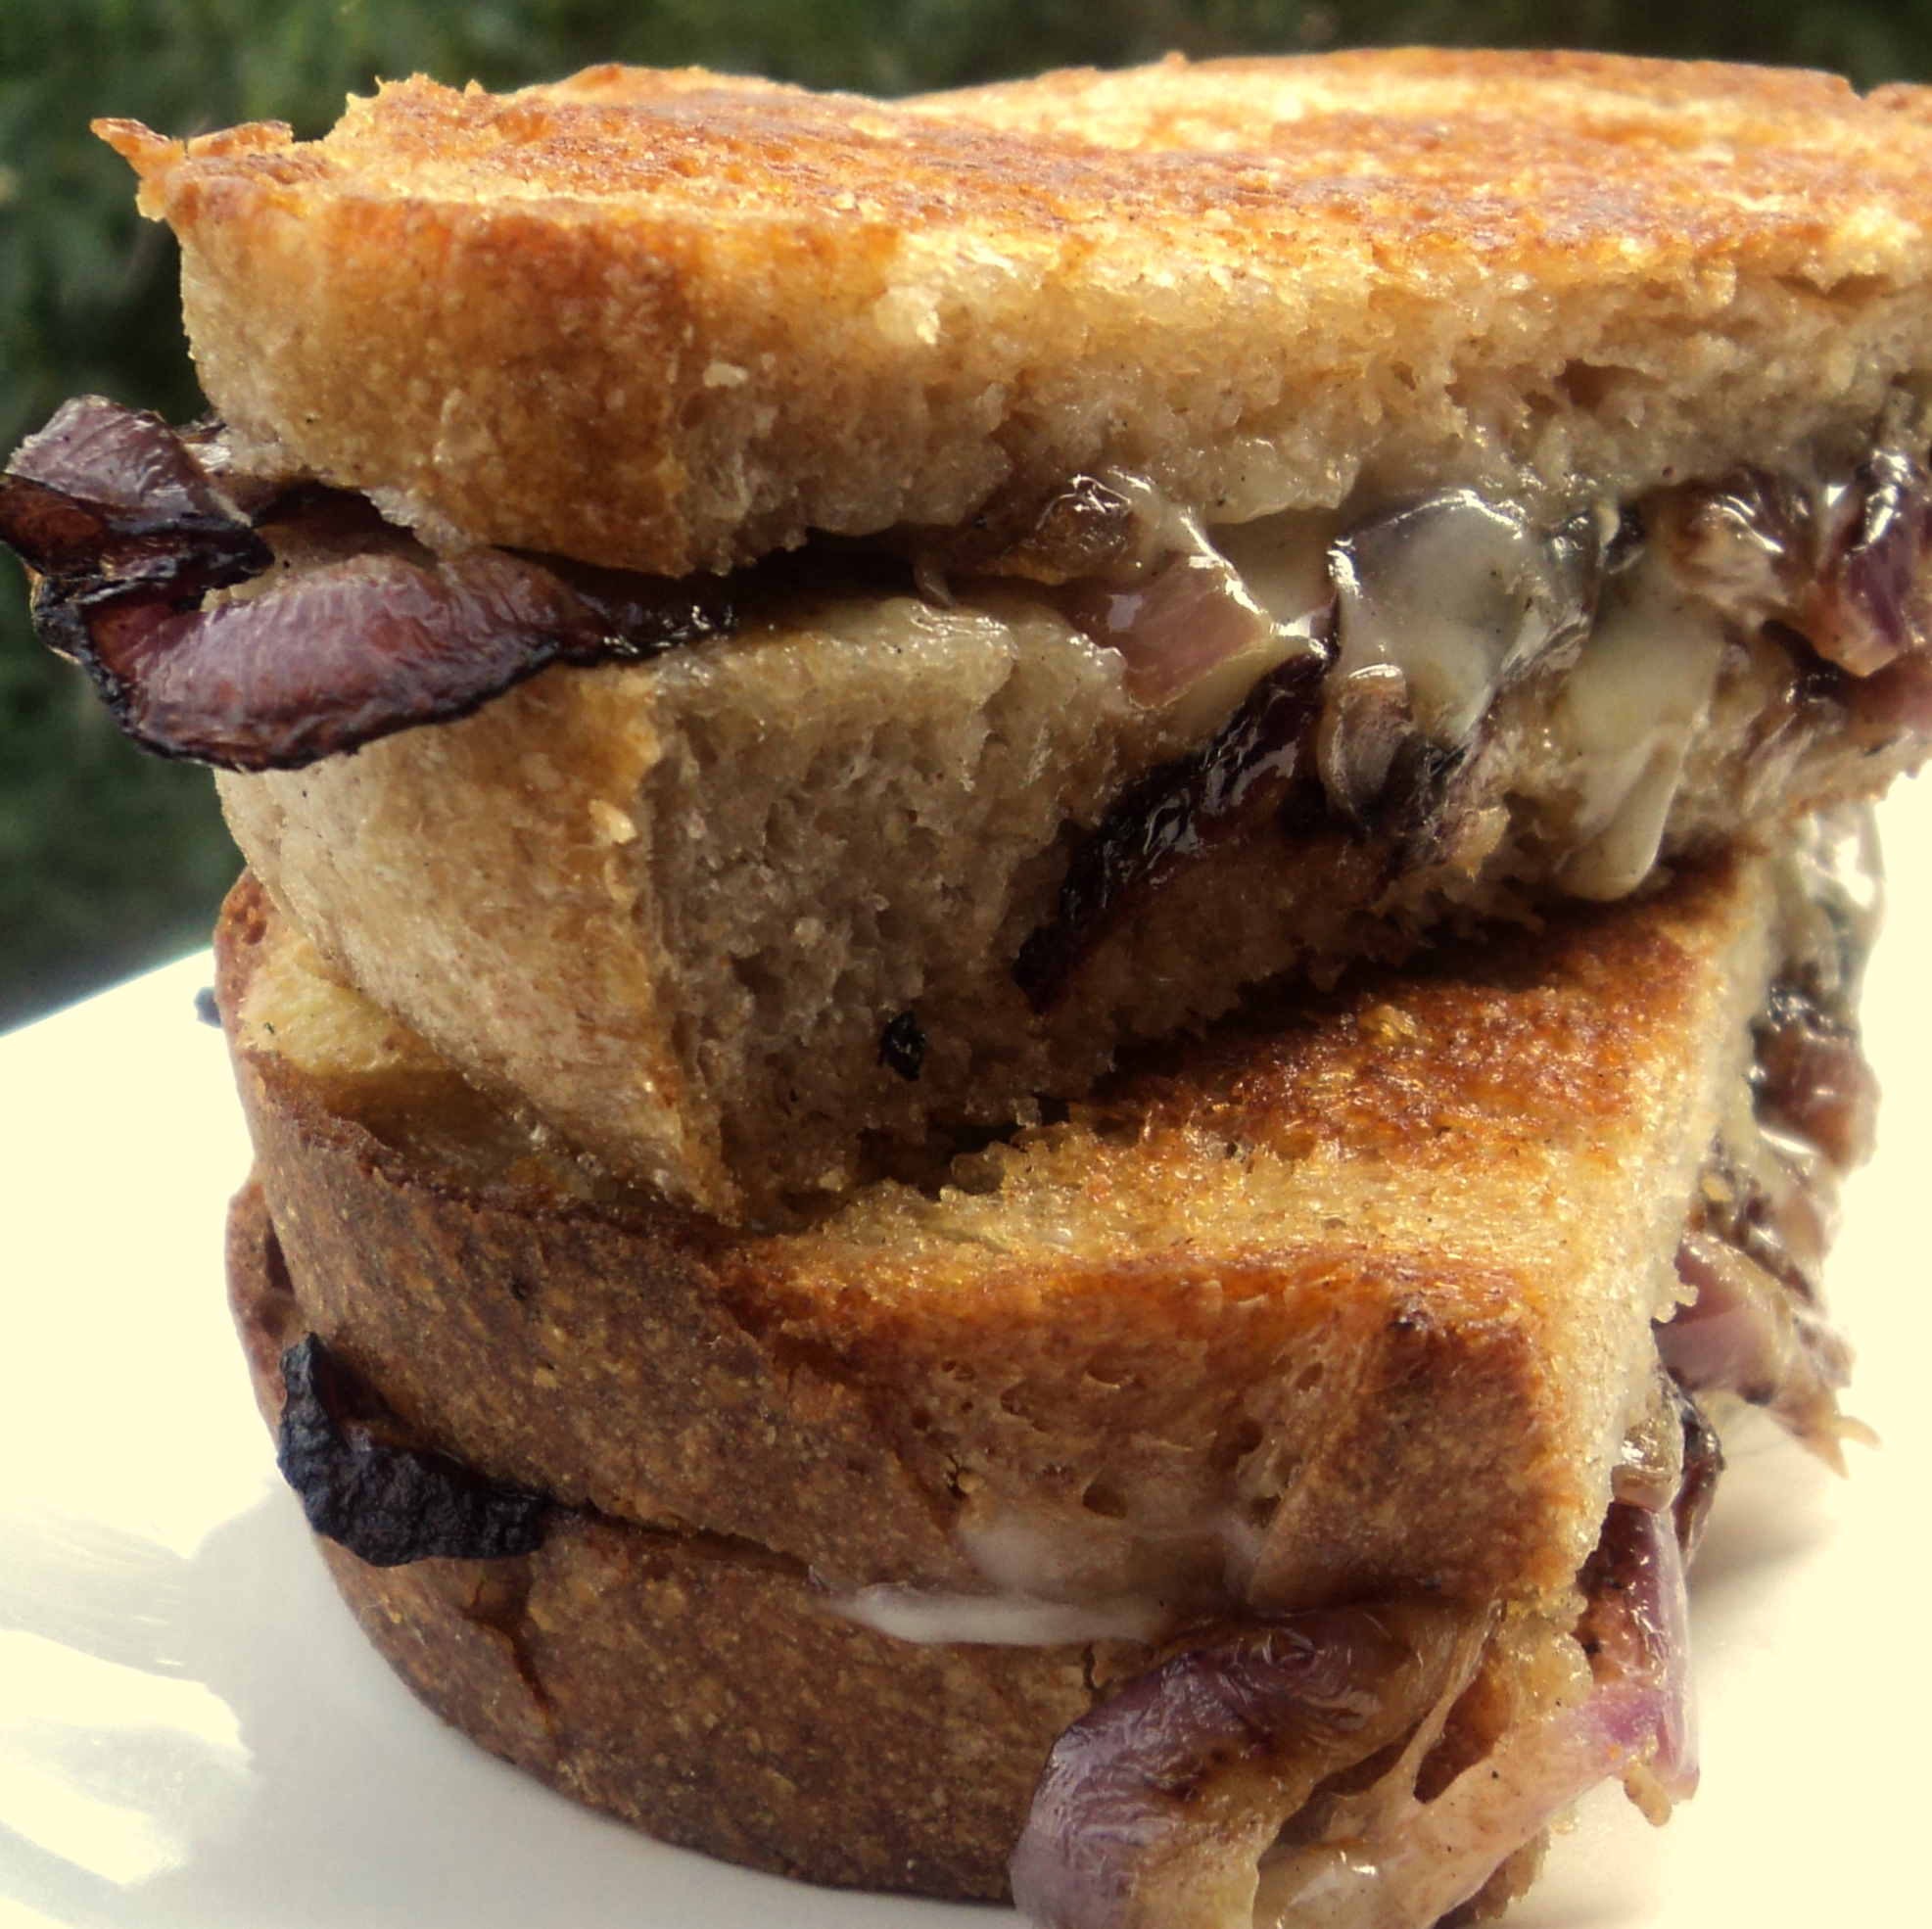
This Grilled Cheese with White Cheddar, Carmelized Onions and Sage recipe from Gaby over at Broke-ass Gourmet is super easy and insanely delicious.  Luc and I both inhaled them. It's just not the same without  white sourdough bread so don't be tempted to sub in something healthier -- sometimes it's just not worth the compromise. Next time you have a craving for some goey cheesy goodness make this super flavorful sandwich, you will not be dissapointed!


Wednesday, May 11, 2011

Herbed Mushroom Sandwich Spread

Happy belated Mother's Day! We went away to visit my parents and spent much of Monday afternoon sitting in a rural hospital waiting room since Luc had a terrible ear infection -- other than that it was a good weekend out of the city!  This is the second ear infection in two months so I really hope that he isn't one of those kids that constantly have them...fingers crossed.

Onto more delicious topics, this spread is really yummy. It tastes like concentrated homemade Cream of Mushroom soup. However good it tastes, I could not make this recipe look anything other than gross in a picture and so this is a picture of Luc's lunch that featured this spread. He gets a kick out of eating shapes he knows so anything shaped like a star, heart, ball, or circle goes down well these days. Also delicious served with crackers or crispbreads, both for munchkins and adults. Suitable for babies from 8 months, just cut bread spread with this mixture into a tiny dice once baby shows interest in finger foods.


Herbed Mushroom Sandwich Spread

- 1 1/2 cups sliced white button mushrooms
- 2 shallots, diced
- 1 tbsp butter
- 3 tbsp fresh flat-leaf parsley, chopped
- 1/4 cup softened cream cheese

In a large skillet, melt the butter over med-low heat. When bubbling slightly, add the mushrooms and diced shallots and cook, stirring occassionally, until both are softened, about 8 minutes. Stir in chopped parsley.

Let mushroom mixture cool while the cream cheese is softening.


Whiz mushroom mixture with cream cheese in a food processor until fully combined and creamy.

*will keep in the fridge for 1 week


Monday, May 2, 2011

Turkey and Mango Quesadillas

I had some frozen leftover turkey from Easter, but you could of course always use leftover cooked chicken to make these quick and fresh tasting quesadillas.I didn't include amounts for the filling because really, you can just eyeball it - just be careful not to overfill or it will come tumbling out as you try to eat. This quesadilla was completely gobbled when I put half of it in Luc's packed lunch. 

While there is nothing in this sandwich that makes it inappropriate younger babies, it's really best for older infants and toddlers fully able to eat finger foods.  You can either cut it into little squares for younger ones or cut into 4's as below for older toddlers, kids and adults.


Turkey and Mango Quesadillas

- cooked shredded turkey meat (or chicken)
- diced ripe mango
- Monterrey Jack cheese
- black pepper, to taste
- minced cilantro
- 6 inch whole wheat tortilla


Assemble the quesadilla. Only put toppings on one half of the tortilla and then fold it over. I like to put some cheese both first and last to make sure the whole thing melds together as it melts. 

In a frying pan on med-low heat, melt a tiny pat of butter (or you can spray the the pan with cooking spray,  but it doesn't taste as good). Press the quesadilla down occasionally as it cooks to flatten to make it easier for little mouths to eat. Cook until golden, melty, and yummy. Allow to cool somewhat before cutting to keep the goodness from escaping. 


* makes 1 adult serving or 2 toddler servings

Friday, April 29, 2011

Baby's Cheesy Pasta

I haven't posted a great deal of recipes for the little munchkins lately (although I have some things in the works), so I thought I would tell you about this super simple homemade baby food recipe that was one of Luc's favorites. It was invaluable to me because I could whip it up with items I always had on hand when life became less than organized. I adapted this recipe from one on Wholesome Baby Food (an absolutely excellent website BTW). This is a great recipe to introduce baby to cheese, starting from 8 months and Luc, who is now almost two, will still gladly eat this little dish.


Baby's Cheesy Pasta

- 1 cup pastina (baby pasta)
- 1 1/2 cups salt-free chicken broth (or vegetable)
- 1/2 cup carrot puree (about 2 Baby Cubes worth)
- 3 tbsp grated cheddar cheese


Cook pastina in the broth in a medium saucepan according to the length of time on the package. Drain any unabsorbed broth and save for another purpose.


Stir in carrot puree and cheese. Serve to hungry little people.


* Makes 4-5 baby servings
* Can be frozen although better texture if it isn't. Can be kept in the refrigerator for up to 3 days.

Wednesday, March 30, 2011

Senegalese Peanut and Tomato Soup

I have been making this soup for years and I don't know why I never thought to post it before. We make it at least once every 2 weeks since it's my husband's favorite. It's super quick, super easy, and super adaptable and uses things that I almost always have on hand. This is also a great recipe to make after poaching a whole chicken as it uses both the wonderfully flavorful broth and some of the tender chicken. You can also easily make this a vegan recipe by using vegetable broth and leaving out the chicken. Let me know if you like this soup as much as we do!


Senegalese Peanut and Tomato Soup

- 1 medium onion, chopped
- 1/4 tsp kosher salt
- black pepper, to taste
- 2 tbsp canola or coconut oil
- 2 tsp Madras curry powder
- 2 cups chicken broth
- 1 14 oz can diced tomatoes, regular or fire-roasted
- 1/2 cup rice (I prefer basmati for this recipe)
- 1 cup chopped cooked chicken, shredded
- 1/4 smooth peanut butter
- 1 cup hot water
- 2 tbsp fresh cilantro, chopped


1. In a medium saucepan, heat the oil over medium heat. Add the onion, salt, and pepper and saute until softened, but not browned (about 5 minutes).


2. Add curry powder and cook stirring until very fragrant (about 2 minutes). 


3. Add the tomatoes with their juice, the broth, and the rice. Stir. Bring up to a boil. Cover and lower to a simmer and cook until rice is done (depending on the rice type you choose, white basmati = 18 minutes). 


4. Once rice is cooked, stir peanut butter into hot water until melted and smooth and add to soup along with cooked chicken. Continue to simmer for about 5 minutes until the soup returns to temperature. 


5. Stir in chopped cilantro and serve. 


* Serves 4
* Suitable for babies over 10 months.


Monday, March 21, 2011

Savory Corn and Cheese Mini Muffins

In my return to work I have realized that it is less tiring being at work than being at home with Luc! Apparently he behaves well at day care and is 'helpful'. I need to find out what their magic is. In the short time it took me to whip these muffins together he managed to eat half a crayon, eat half a dog biscuit, pull the cat's tail, throw a tantrum and defeat the child safety lock on the dining room sideboard....all while I was in the same room and in a span of about 20 minutes. 
 
Oh well...at least the muffins are mighty tasty! I've made them before but made a couple changes this time around and now they are even better. Perfect as a snack, breakfast, or served on the side with soup, these are great at home or in a packed lunch. I adapted this recipe from Top 100 Finger Foods: 100 Recipes for a Healthy, Happy Child.Suitable for munchkins 10 months and up.


Savory Corn and Cheese Mini Muffins

- 3/4 cup drained canned corn or thawed frozen
- 2 green onions, roughly chopped
- 1/4 plain yogurt
- 1 tbsp maple syrup or honey
- 1 egg
- 2 tbsp butter, melted and cooled slightly
- 1/2 cup all-purpose flour
- 2 tbsp corn meal
- 1/2 tsp baking soda
- 1/2 tsp baking powder
- 1/4 tsp sea salt
- 1/8 tsp paprika
- 1/2 cup grated sharp cheddar

Preheat the oven to 350 degrees Fahrenheit. 

Add corn and green onions to a good processor or blender and whiz until chopped. Add yogurt, butter, maple syrup and egg and whiz again to combine.

Mix dry ingredients in a medium bowl. Add yogurt mixture to dry ingredient and stir until just combined. Stir in the grated cheese to the mixture. 

Spoon batter into a mini muffin pan, adding about 3/4 tbsp to each cup (the picture shows the muffins with a paper liner, but having tried both, I would suggest just using a greased muffin tin without liners as the muffins stick awfully to the paper).

Bake for 12-15 minutes until risen, golden, and firm to the touch. Cool in the pan.

* Makes 10-12 mini muffins
* These keep well in an airtight bag in the freezer for up to 3 months

Thursday, January 27, 2011

Cheesy Leftover Pasta Frittata

I accidentally cooked too much pasta for a dish a couple days ago and had some leftover that I didn't want to go to waste. This frittata was a simple and tasty way to use it up and while you could have it for breakfast or brunch, it also makes a great lunch with a salad on the side. The possibilities for variations with this one are virtually endless, making it a great way to clean out the fridge!


Cheesy Leftover Pasta Frittata

- 1/2 cup onion, chopped
- 1 tbsp olive oil
- 1 tbsp butter
- 6 eggs
- 1/4 cup milk
- 1/2 cup frozen peas
- 1/3 cup Parmesan cheese, grated
- 1 tbsp fresh basil, minced
- salt and pepper, to taste
- 1 cup cheddar cheese, grated
- 1 cup cooked pasta (any kind, but if long like spaghetti, cut into 1" pieces)

Preheat the broiler. In a heavy, oven-proof skillet, melt the butter and oil over medium heat. Add the onion and cook until it starts to soften, about 3 minutes. Meanwhile, in a large bowl, beat the eggs. Add the milk, basil, Parmesan, and season with salt and pepper. Stir the pasta and peas into the egg mixture.


Add the egg mixture to the skillet with the onion, gently pushing the pasta around until it is evenly distributed. Cook over medium-low heat until the egg is almost set. Remove from the heat and sprinkle the top evenly with the cheddar. 


Transfer the pan to the oven under the broiler, about 4-5" from the heat and cook for 5-8 minutes until the fritatta is set and is slightly golden brown.


Remove from oven, cut into wedges and serve. 


* this recipe is suitable for babies over age one, due to egg whites.
* this recipe is best eaten right away.


VARIATION: Substitute chopped green pepper for half of the onion, and Swiss for half of the cheddar.

Sunday, January 2, 2011

Lemony Millet Pilaf

We were supposed to have Spanish-style quinoa with supper tonight, however, when I went to grab the quinoa I discovered that there were only a few tablespoons of it left and our last red pepper was fit for the compost. I came up with this millet side dish instead and not only was it easy peasy, but it turned out really well. It's quite lemony, but not overly so and the flavour of the vegetables really comes through. Over the past year, we have been trying to incorporate a wider variety of whole grains into our diets, but have struggled to find a good side dish recipe for millet. Well, we have one now! This dish is suitable for all members of the family over age 1, but you could make it work for younger babies by squeezing lemon juice over the dish after removing a baby-sized portion and omitting the salt.


Lemony Millet Pilaf 

 - 2 tsp olive oil (or use some of the oil from the sun-dried tomatoes for more flavour)
- 1 small onion, finely chopped
- 2 stalks celery, finely chopped
- 1 clove garlic, minced
- 3/4 cup millet
- 1 1/2 cups low-sodium chicken or vegetable broth
- juice of 1/2 lemon
- 1/4 cup sun-dried tomatoes, well drained and finely chopped 
- 1/2 tsp sea salt
- freshly ground black pepper, to taste
- 1/4 cup chopped fresh italian (flat-leaf) parsley


In a medium saucepan heat the olive oil over medium heat and add the onion, celery, and garlic, salt and pepper. Cook until vegetables softened and fragrant, about 8 minutes. Add the millet; stir well to coat the grains in oil and cook about 1 minute more. Add broth, lemon juice, and sun-dried tomatoes. Bring to a simmer, cover, and reduce heat to low. Let cook for 20-25 minutes until all the liquid is absorbed, adding a little extra water or broth if it looks as though it is getting too dry. Remove from the heat and let sit 10 minutes until grains are tender. Fluff with a fork and serve. 


Makes 4 side-dish servings

Wednesday, December 22, 2010

Curried Chicken and Cheese Balls

These are super quick and easy when you have cooked chicken on hand (for instance, if you poached a whole chicken) as they require no cooking besides that. And, isn't everything more appealing for kids when it's in the form of a ball? These are great toddler eats, but would also be fantastic in a lunch box for an older child. 


Curried Chicken and Cheese Balls

1/2 cup cubed or shredded cooked chicken
1/4 cup shredded cheddar cheese
3 tsp minced onion
1/8 tsp curry powder
tiny pinch sea salt, optional
3 tbsp wheat germ

Put all the ingredients, except the wheat germ, in a small food processor or blender and blend until you have a uniform crumbly texture. Try rolling into a ball, if it is too dry, add 1 tsp water. Form into small balls and roll gently in the wheat germ spread on a plate. Chill and serve.

Makes about 10 balls

Monday, December 20, 2010

Pizza Muffins

When I saw this recipe for Pizza Muffins over at Happy Healthy Mama, I knew I had to try them. Not only are they healthy but they seem really appealing to both toddlers and big kids. They turned out pretty well and Luc seems to like them too. Next time, I will cook them at 350 degrees fahrenheit instead 400 and I think I will add some chopped black olives because Luc loves them. Thank you to Maryea at Happy Healthy Mama for this great meal on the go recipe! Be sure to check out the recipe here.

Friday, December 17, 2010

Staple Recipe: Poached Whole Chicken

For some reason, it took me until this year to poach my first whole chicken. I had used the technique with breasts but never the whole bird, as well as saved up my bones in the freezer for making broth which is much the same technique. After I realized what a great way to cook poultry it was and how incredibly far I could make one chicken go this way, I felt like a total dumbass for not getting with the poaching program earlier! Not only do I get enough chicken meat for 4 or 5 family meals, but I also usually get around 20 cups of delicious homemade broth. I usually freeze all the broth in two cup portions, except for what I will use in the next couple days, in either containers or baggies put in a large freezer bag. The chicken you can use in literally hundreds of ways. I like to cut off at least one chicken breast and slice over a salad and toss the whole deal with dressing for when I'm in a big rush. The rest of the chicken I usually shred with my hands and freeze in one cup portions to use in any recipe where cooked chicken is called for. you can even save the chicken fat if you'd like, its good to make Matzo balls and it also tastes good in savory breads. 

Some easy uses I like for the chicken include: quesadillas, White Chili (this is an excellent one), chicken pot pie, chicken curry, etc etc etc. I hope that if you aren't already in the habit of poaching whole chickens that you will love this technique as much as I do! You will need your biggest stock pot with a lid to make cook this in.


Whole Poached Chicken

- 1 whole chicken, 5-6 pounds
- 1 large onion, peeled and quartered
- 2 carrots, cut into big chunks
- 2 stalks celery, cut into big chunks
- 1 bay leaf
- 1/4 lemon
- big handful of fresh parsley, stems and all
- small palmful of peppercorns
- any other scrubbed vegetable scraps you have hanging around, I usually keep them frozen in a bag to add to this, such as leek, fennel, parsnip, etc. If I have some on hand, I also throw in a couple sprigs of fresh thyme.

Place everything into your stockpot. Fill with water until the chicken is covered by 2 inches. Bring to a boil over high heat, then lower the heat to medium and simmer for 25 minutes. During this time, skim off any of the gross grey stuff that comes to the top. 

Turn off the heat and cover the pot with a tight-fitting lid. Let the chicken poach in the hot liquid for 1 1/2 hours. 

Remove the chicken from the stockpot, letting the juices drain, making sure that they run clear (which tells you that it's done, if juices are pinkish it isn't cooked, heat to a simmer and turn off and let sit 1/2 hour more). Transfer the chicken to a cutting board and let it cool. Strain out the vegetables from the broth and discard. Let the broth cool. Once it is cool, transfer it to the fridge. 

Once the chicken is cool, remove the meat from the bones, shredding with your finger, discarding the skin and bones. Either keep the breasts whole or shred it all. Pack up the chicken to store in the fridge or freezer. 

Once the broth is cold, you can skim off the fat and either discard it or save it for another use (it also freezes well--I freeze it in Baby Cubes). Divide the broth how you'd like, and store it in the fridge or freezer. 

Thursday, December 16, 2010

Pasta with Pumpkin Sage Sauce

Our whole family loves anything made with pumpkin, both sweet and savory,which works out great since it's so healthy, containing 236% of your daily recommended intake of Vitamin A among other vitamins and antioxidants. This pasta sauce recipe is a great easy one for babies, toddlers, or anyone else. It is also super quick, which is why I made it today as this has been a very busy week with exams, redecorating our bedroom, and Christmas shopping on top of all the usual busyness! You can puree the whole meal with the pasta for younger babies (from 8 months) or use tiny pastina.The sauce also freezes well for up to three months.


Pasta with Pumpkin Sage Sauce

- 1 cup pumpkin puree, canned or homemade
- 1/2 small onion, very finely chopped
- 1/3 cup low-sodium chicken or vegetable broth
- 1 tbsp butter
- 1 tbsp applesauce or apple puree   
- 1/2 tsp dried sage
- tiny pinch cinnamon
- freshly grated parmesan cheese (optional)

In a small saucepan, heat butter over medium-low heat and cook onion until it becomes fragrant and starts to soften, about a minute. Add pumpkin puree, applesauce, sage, cinnamon, and broth and simmer about 5 minutes to let flavour combine. Add more broth if the sauce needs a little thinning. If choosing, stir parmesan into the sauce now, or serve on top. Spoon onto your munchkin's favourite pasta. 

Makes enough for roughly 5-6 baby servings or 3-4 toddler servings.

Thursday, December 9, 2010

Camembert Grilled Cheese with Carmelized Apples and Onions


This is a perfect seasonal winter sandwich for your kids and yourself. It's also as frugal as it is yummy since it seems that Camembert and brie are on sale at every grocery store as we near the holiday season, and apples and apples and onions are always affordable (I got a 3 lb bag of organic local apples for 1.99 and a 5lb bag of local onions for .99 ). I used my homemade half whole wheat, half white bread for this sandwich but you could use whatever you have on hand. My loaf was large though, so while I got one big sandwich from these amounts, it would make two with more modestly proportioned bread. This recipe would also be great for the panini press, but I'm not lucky enough to own one. :(


Camembert Grilled Cheese with Carmelized Apples and Onions

- 4 slices of bread- thin slices of Camembert, enough to cover two of the bread slices
- 1 apple, cut into thin slices
- 1/2 small onion, sliced into thin rounds and rings separated
- 1 tbsp unsalted butter
- 1/2 tbsp olive oil
- black pepper, to taste 

 In a large skilled place 1/2 tbsp butter and the olive oil and melt over medium heat. Once melted, add the onions and apples and cook, stirring occasionally, until they are browned. Take off the heat and add black pepper. 

While the apples and onions are cooking, prepare your bread by spreading the rest of the butter on one side of the bread slices. Top two of the slices with sliced Camembert. Top both sandwiches with the onion and apple mixture and top with another slice.

Wipe out the frying pan of any excess oil, and then add the sandwiches. Press down with another pan or plate to flatten. Cook until golden, flip, and do the same. 

Enjoy! 

Makes 2 sandwiches (one for the munchkin and one for you!) 

Sunday, December 5, 2010

Tex-Mex Chicken Quesadilla (and Veg Version)


This simple quesadilla is one of the only ways I can get Luc to eat chicken since he isn't thrilled about it. I also pretty much always have cooked chicken on hand or in the freezer from poaching or roasting a whole bird.

Tex-Mex Chicken Quesadilla 

1 small whole wheat tortilla
3 tbsp grated cheddar cheese
1 tbsp finely chopped green onion
2 tbsp finely chopped cooked chicken
chili powder, sprinkle.


(* I don't actually measure anything for these, this is just a rough idea)

Assemble the quesadilla. Only put toppings on one half of the tortilla and then fold it over. I like to put some cheese both first and last to make sure the whole thing melds together as it melts. 

In a frying pan on med-low heat, melt a tiny pat of butter (or you can spray the the pan with cooking spray,  but it doesn't taste as good). Press the quesadilla down occasionally as it cooks to flatten to make it easier for little mouths. Cook until golden, melty, and yummy. Allow to cool somewhat before cutting to keep the goodness from escaping. I usually make myself a couple at the same time.


Vegetarian Version: Substitute black beans or pinto beans for the chicken. Mash them with a fork and use like a spread to prevent them from rolling out of the quesadilla.

Related Posts Plugin for WordPress, Blogger...